
How to zero correctly?
Note: Please read this section carefully before use!
See the 'How to Zero Correctly' video: https://youtu.be/GndC8hSMygw (Video Courtesy Of - StealthPineTactics)
Here are the steps to zero:
1. Secure the gun to a tripod or sandbag to ensure stability.
2. Visually adjust the red dot position to roughly align it with the barrel axis.
3. Fire the first group of shots (3–5 rounds) within 25 yards, record the center position of the impact cluster, and check for any deviation between the impact points and the aiming point.
4. Measure or estimate the lateral deviation between the center of the impact points and the center of the aiming point. Calculate the adjustment amount.
5. Measure or estimate the vertical deviation between the center of the impact point and the center of the aiming point. Calculate the adjustment amount.
6. Make adjustments based on the actual direction of deviation.
7. After making adjustments based on the actual direction, fire another 3-5 rounds to confirm that the impact points align with the red dot.
8. If there is still deviation, repeat the fine-tuning process until satisfied.
Calculate MOA Adjustment Distance.
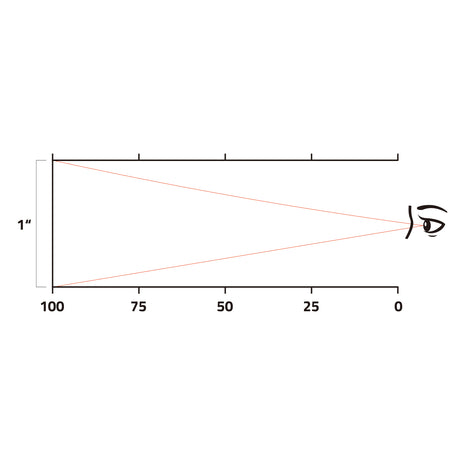
1. If your adjustment increment is 1 MOA per 100 yards, then the conversion formula for the number of adjustments of the 50 yards click is 100 ÷ 50=2 times. Therefore, the distance of each click at 50 yards is 1 MOA ÷ 2=0.5 MOA.
Similarly, each time you zero at 25 yards, move the point of impact by 0.25 inches. This means: if you want to move 1 inch at 25 yards, you need to make 4 clicks.
2. If you zero at 15 yards, and you have calculated the horizontal (windage) and vertical (elevation) deviations between the center of the impact point and the center of the aiming point, then you can calculate the adjustment amount. For example, if the horizontal deviation is 2.15 inches, the number of adjustments is 2.15 × (100 yards / 15 yards) = 14.33 clicks. This means you need to turn the windage adjustment by 14 or 15 clicks to aim at the target.
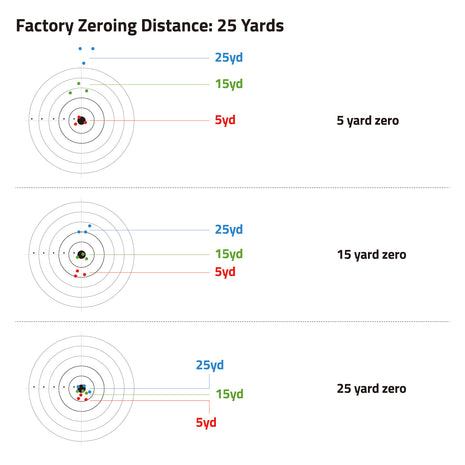
Choose the Correct Zeroing Distance.
The shorter the zeroing distance is, the greater the error will be. 15 yards is enough for zeroing, but the most accurate is 25 yards.
This advice is based on real-world shooting data and has been verified by independent professional sources.
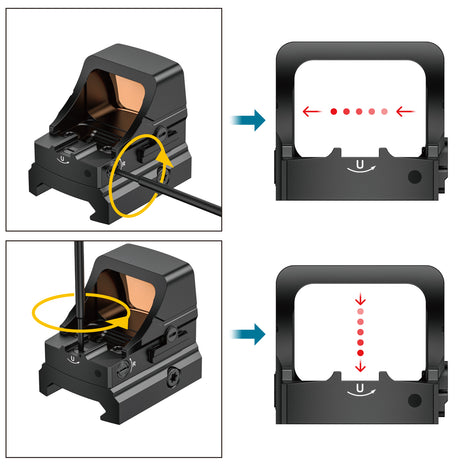
Rotating your optic adjustment in the direction of "UP" moves the dot DOWN.
Rotating your optic adjustment in the direction of "R/RIGHT" moves the dot LEFT.
UP/RIGHT means movement to Point of Impact(POI), or where the bullet hits it moves OPPOSITE the direction of where your dot hits
This is an INDUSTRY WIDE STANDARD and all optic devices use this system.
How to install red dots correctly?
After installing the red dot, you may notice that it becomes loose after using it a few times. This is actually related to the wrong way you installed the red dot.Below is the correct way to install the red dot:

Precautions During the Zeroing Process & Troubleshooting Issues with Holding Zero:
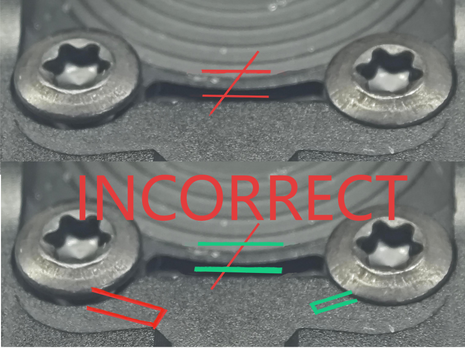
1. Only Use Screws Included with The Optic - DO NOT Use Any Other Screws
If both screwheads do not match with appearance of depth then your optic is installed incorrectly and at least one screw is too long.
2. Red Dot Adjustment Not Moving?
Lock It Down & Use a Reference! Never adjust while hand-holding. Here's the pro method:
a. SECURE your pistol in a rest (bags, vise).
b. Aim at a small, FIXED point (bullseye or laser bore dot).
c. Adjust ONLY THE RED DOT'S KNOBS until the dot overlaps the point.
d. Fire test shots, repeat at desired zero distance.
3. We Recommend Using A Laser Sight To Check
If you have a laser bore sight, install it at 25 yards without removing it or engaging the slide/barrel, then gently rotate or tap the optic with a rubber mallet. Observe if the red dot moves during or after the test. If you do not have a laser bore sight, we recommend acquiring one. Note that the bore sight may shift its position if removed or replaced.
4. Ammunition Replacement Will Also Cause Zero Point Offset
Changing the type of ammunition used from the one you zeroed with may cause slight shifts in zero. Use a bench rest to check for any movement, as even a slight trigger pull can affect the point of impact.
5. Check If There Are Any Discrepancies With The Red Dot Installation Steps We Attached
6. Check Whether The Maximum Adjustment Range Of The Red Dot Is Exceeded
Each red dot sight has a different adjustment range. You need to first check the maximum adjustment range in the manual and then adjust the red dot based on this maximum adjustment range. Each click = 1 MOA.
7. The Adjusting Screw Cannot Be Adjusted By Force
STOP FORCING THE CLICKS! If the adjustment screw won't turn, you've hit its mechanical limit. Forcing it WILL break internal components.If your optic reaches its adjustment limit on your pistol, try using it on another pistol, or attempt to remove and reinstall it.
Following this checklist can resolve many zeroing issues that might not be solved by simply replacing the optic.
See the zeroing troubleshooting video: https://youtu.be/1nhH1BaZfro
Do Green Reticles Help With Astigmatism?
Does a green reticle help correct astigmatism?
You may have heard that green reticles are better for people with astigmatism. But is there any truth to this? Let's delve deeper.
What is astigmatism? Astigmatism is a common vision problem in which the eye cannot focus light evenly onto the retina. This results in blurred or distorted vision, especially when viewing at a distance. Astigmatism is caused by irregularities in the shape of the cornea or lens.
The reason a green reticle helps correct astigmatism is that the human eye is more sensitive to green light. Our eyes have more cones sensitive to green light than to red or blue light. This means that a green reticle appears clearer to people with astigmatism than a red or amber one. While there is some truth to this claim, it's limited. For people with astigmatism, the difference in perceived clarity between a green and red reticle is very small. It won't be a significant difference.
However, if you do have astigmatism, a green reticle may give you a slight advantage in target acquisition and field of view. The reticle will appear sharper, which can help you aim faster.
The following factors affect reticle visibility:
1. Lighting Conditions: In low-light conditions, a green reticle can actually appear dimmer than a red one. Therefore, if you often shoot in dark or indoor settings, a red reticle may be a better choice.
2. Reticle Brightness: The brightness of the reticle itself also plays a role. Very dark reticles, regardless of color, can be difficult to see clearly. Make sure the brightness is set high enough for a clear, sharp reticle.
3. Reticle Size: Larger reticle size is generally better, especially for those with astigmatism. Larger reticles appear sharper and clearer than smaller ones.
4. Reticle Design: The actual design of the reticle can also have an impact. Simple, clean, minimally cluttered reticles tend to be easier to focus on than complex, intricate designs.
Here are some suggestions:
If you have astigmatism, it's recommended that you try both green and red dot reticles to see which works best for you. The difference between the two can be subtle, but you may find that one color appears sharper and clearer, making it easier to focus. The ultimate goal is to achieve a reticle that's bright enough, large enough, and simple in design. Color is secondary. Focus on other factors first, then decide whether green or red is more comfortable for your eyes.
If you have any questions, please contact us!
Explore our comprehensive FAQ section to learn how to mount, zero, and troubleshoot your red dot sight. Whether you're a beginner or a pro, find the answers you need to get the most out of your gear.