Featured collection
-

-
$159.99 $131.99
-

-
$63.59

Erfahren Sie die 7 häufigsten Fehler bei der Montage von Shake Awake-Optiken auf AR-15, um Leistung und Genauigkeit zu verbessern.
Shake Awake-Optiken – wie bewegungsaktivierte Rotpunkt- und Reflexvisiere – sind ein echter Fortschritt für AR-15-Nutzer. Mit sofortiger Aktivierung und langer Batterielaufzeit bieten sie sowohl Schnelligkeit als auch Zuverlässigkeit. Aber selbst die fortschrittlichste Optik funktioniert nicht gut, wenn sie falsch montiert ist. Wenn Ihr Visier den Nullpunkt nicht hält oder sich zufällig ausschaltet, liegt das Problem möglicherweise nicht an der Optik selbst, sondern an der Art der Installation.
Die meisten AR-15-Gewehre sind mit standardmäßigen Picatinny (MIL-STD-1913) Schienen ausgestattet, die eine gleichmäßige Abstands- und Querschlitzdimension bieten und ideal für die sichere Montage von Shake Awake-Optiken sind. Allerdings sind nicht alle Schienensysteme gleich. Einige günstige oder ältere Aftermarket-Teile – insbesondere Handschutz oder obere Empfänger – können Weaver-Schienen oder sogar proprietäre Designs haben. Obwohl Weaver und Picatinny ähnlich aussehen, gibt es wichtige Unterschiede bei Schlitzbreite und Abstand, die die Stabilität und Kompatibilität der Optik beeinflussen können.
Die Verwendung des falschen Montagetypen auf der falschen Schiene kann zu schlechter Passform, Verschiebung der Optik unter Rückstoß oder sogar zu Schäden am Visier führen. Zum Beispiel kann ein Weaver-Ring auf einer Picatinny-Schiene zu locker sitzen, während eine Picatinny-kompatible Basis möglicherweise gar nicht in einen Weaver-Schlitz einrastet. Wenn Sie unsicher sind, konsultieren Sie die Spezifikationen Ihres Gewehrs oder wenden Sie sich an den Hersteller der Schiene oder Montage für Klarstellungen.
Seien Sie auch vorsichtig bei ultra-günstigen Montagen, die auf Auktionsseiten oder von No-Name-Marken angeboten werden. Diese verwenden oft weiche Metalle, die sich leicht abnutzen oder unter Druck verformen können, besonders bei wiederholtem Schießen. Eine schlecht gefertigte Montage kann auch den Nullpunkt nicht halten, wodurch Ihr Präzisionsgewehr zu einem Ratespiel wird.
Kurz gesagt: passen Sie das Montagesystem Ihrer Optik immer an den Schienentyp Ihres Gewehrs an und investieren Sie in hochwertige Montagen aus langlebigen Materialien wie Flugzeugaluminium. Es ist eine kleine Anfangsinvestition, die Ihre Optik schützt und zuverlässige Leistung garantiert, wenn es darauf ankommt.
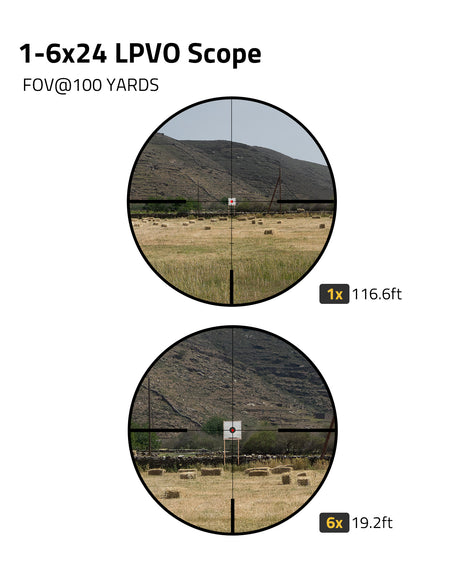
Schon eine leichte Neigung – wenn Ihre Optik nicht perfekt waagerecht zum Gewehr ausgerichtet ist – kann den Einschlagpunkt verschieben, besonders bei größeren Entfernungen. Dieses Problem wird noch kritischer bei Shake Awake-Rotpunkten oder Reflexvisieren, die für schnelle Zielerfassung ausgelegt sind. Eine geneigte Optik mag aus nächster Nähe noch „gut aussehen“, aber auf 100 Yards oder mehr können schon wenige Grad Abweichung mehrere Zentimeter Fehlschuss bedeuten.
Um dies zu vermeiden, nehmen Sie sich immer die Zeit, Ihre Optik bei der Montage auszurichten. Die zuverlässigste Methode ist die Verwendung einer Wasserwaage oder eines speziellen Optik-Ausrichtwerkzeugs. Klemmen Sie Ihr Gewehr sicher in einen Schraubstock oder eine Waffenauflage und stellen Sie sicher, dass der obere Empfänger waagerecht ist. Legen Sie dann eine kleine Wasserwaage über die obere Schiene oder eine flache Fläche des Empfängers. Sobald das Gewehr ausgerichtet ist, montieren Sie Ihre Optik und justieren sie, bis die Turmdeckel oder das flache Oberteil der Optik waagerecht zum Gewehr stehen.
Manche Schützen versuchen, die Ausrichtung „nach Augenmaß“ vorzunehmen, aber das ist riskant. Die menschliche Wahrnehmung ist nicht präzise genug für konstante Genauigkeit, besonders bei Rückstoß, Bewegung und Umgebungsbedingungen. Eine Wasserwaage sorgt für Präzision und eliminiert das Rätselraten.
Eine korrekte Ausrichtung stellt sicher, dass Ihr Punkt oder Fadenkreuz mit der Laufachse übereinstimmt, sodass jeder Schuss unabhängig von der Entfernung genau trifft. Es ist einer der einfachsten, aber am meisten übersehenen Schritte bei der Optikeinrichtung – und richtig gemacht kann er den Unterschied zwischen Treffer und Fehlschuss ausmachen.
Verwenden Sie beim Montieren Ihrer Optik immer einen hochwertigen Drehmomentschlüssel und halten Sie sich genau an die vom Hersteller empfohlenen Drehmomentwerte. Für die meisten AR-15-Montagen liegt dieser Bereich typischerweise zwischen 15 und 25 Inch-Pfund. Das richtige Drehmoment ist entscheidend – zu wenig, und die Montage kann sich bei Rückstoß oder rauer Handhabung lockern, wodurch Ihre Optik verrutscht und den Nullpunkt verliert. Zu viel Drehmoment hingegen kann Gewinde beschädigen oder die Montageschrauben und sogar die Optik selbst beschädigen. Durch die Verwendung eines Drehmomentschlüssels und das Einhalten der angegebenen Werte gewährleisten Sie eine sichere, zuverlässige Montage, die konstante Leistung bietet, ohne Ihr Gewehr oder Zielfernrohr zu gefährden.
Beim Montieren Ihrer Optik auf einem AR-15 ist es im Allgemeinen am besten, sie direkt vor dem Ladehebel zu positionieren. Diese Platzierung bietet eine natürliche und bequeme Augenentlastung, sodass Sie ein klares Sichtbild erhalten, ohne den Kopf anstrengen oder unnatürlich drehen zu müssen. Das reduziert nicht nur Ermüdung bei längeren Schießsessions, sondern erleichtert auch die richtige Schießhaltung und verbessert Ihr Gesamterlebnis.
Außerdem hilft die Montage an dieser Stelle, Ihre periphere Wahrnehmung zu erhalten. Das ist besonders wichtig bei schnellen Schießszenarien wie 3-Gun-Wettbewerben oder taktischen Übungen, bei denen Sie Ziele schnell erfassen müssen und gleichzeitig Ihre Umgebung im Blick behalten wollen. Eine leicht nach vorne versetzte Optik ermöglicht schnelles Zielerfassen, ohne die Umweltwahrnehmung zu verlieren oder den Kopf übermäßig bewegen zu müssen. Insgesamt bietet diese Positionierung die ideale Balance aus Geschwindigkeit, Komfort und Situationsbewusstsein für die meisten AR-15-Schützen.
Beim Befestigen Ihrer Optik an der Montage ist es ratsam, blauen (mittelstarken) Loctite auf die Montageschrauben aufzutragen. Diese Schraubensicherung verhindert, dass sich die Schrauben durch den wiederholten Rückstoß Ihres AR-15 allmählich lockern, was dazu führen kann, dass Ihre Optik verrutscht oder den Nullpunkt verliert. Blauer Loctite bietet genau den richtigen Halt – er ist stark genug, um alles während des Schießens fest an Ort und Stelle zu halten, lässt sich aber dennoch relativ leicht entfernen, wenn Sie die Optik zur Wartung oder Einstellung abnehmen müssen. Vermeiden Sie hingegen die Verwendung von rotem Loctite für diesen Zweck. Roter Loctite ist eine hochfeste Schraubensicherung, die sehr stark haftet und oft Hitze oder Spezialwerkzeuge zum Lösen erfordert. Die Verwendung von rotem Loctite könnte die Montageschrauben oder sogar Ihre Optik beschädigen, wenn Sie sie später entfernen wollen. Daher ist blauer Loctite die sicherste und praktischste Wahl, um Ihre Optik sicher zu montieren, ohne später Probleme zu verursachen.
Das richtige Drehmoment und die korrekte Ausrichtung Ihrer Optik sorgen nicht nur für eine sichere Befestigung, sondern beeinflussen auch, wie gut die Batteriekontakte im Visier funktionieren. Wenn die Montageschrauben zu fest oder zu locker sind oder die Optik schief auf der Schiene sitzt, können die Batteriekontakte keinen konstanten Kontakt herstellen. Das kann dazu führen, dass Ihre Shake Awake-Optik nicht einschaltet, wenn Sie sie am dringendsten brauchen. Um Überraschungen im Feld zu vermeiden, schütteln Sie Ihr Gewehr nach der Montage sanft, um zu bestätigen, dass das Visier jedes Mal zuverlässig aktiviert wird. Reinigen Sie außerdem vor der Montage die Batteriekontakte und Kontaktpunkte mit einem weichen Tuch oder einer Bürste. Das Entfernen von Staub, Ölen oder Korrosion sorgt für eine starke elektrische Verbindung und hilft Ihrer Optik, sofort beim Bewegen aufzuwecken. Diese einfachen Schritte ersparen Ihnen Frust und halten Ihre Ausrüstung bereit für jede Jagd oder Schießsession.
Nachdem Sie Ihre Optik sicher auf Ihrem AR-15 montiert haben, ist der nächste wichtige Schritt, sie richtig einzuschießen. Einschießen bedeutet, Ihre Optik so einzustellen, dass der Einschlagspunkt mit dem Zielpunkt auf eine bestimmte Entfernung übereinstimmt. Verlassen Sie sich nicht nur auf die Montage und Schrauben – nehmen Sie sich die Zeit, ein paar Probeschüsse auf dem Schießstand abzugeben. So können Sie sicherstellen, dass Ihre Optik korrekt ausgerichtet ist und Ihre Schüsse dort landen, wo Sie es erwarten. Es lohnt sich, diese zusätzliche Zeit zu investieren, denn eine richtig eingeschossene Optik macht den Unterschied, ob Sie auf der Jagd oder im Wettkampf erfolgreich sind.
Nachdem Sie Ihre Optik eingeschossen und Ihre Schüsse überprüft haben, vergessen Sie nicht, nach Ihrer ersten Schießsession die Festigkeit aller Montageschrauben erneut zu kontrollieren. Der erste Rückstoß kann manchmal dazu führen, dass sich Schrauben leicht lockern, besonders wenn sie nicht mit dem richtigen Drehmoment angezogen wurden. Die Sicherstellung, dass alles fest und sicher bleibt, bedeutet, dass Ihre Optik ihren Nullpunkt über die Zeit hält und jederzeit einsatzbereit bleibt. Diese einfachen, aber wichtigen Schritte helfen, Ihre Schießleistung konstant zu halten und Ihre Ausrüstung im Feld optimal funktionieren zu lassen.
Die korrekte Montage Ihrer Shake Awake-Optik ist genauso wichtig wie die Wahl des richtigen Modells. Für AR-15-Nutzer kann das Vermeiden dieser häufigen Fehler den Unterschied zwischen Frustration und einwandfreier Funktion bedeuten. Ob auf dem Schießstand oder im Feld – eine kluge Installation sorgt dafür, dass Ihre Ausrüstung ihr Bestes gibt.
Entdecken Sie die vollständige CVLIFE-Kollektion von Rotpunkten und Reflexvisieren für AR-15s auf unserer Red Dot Optics Seite.
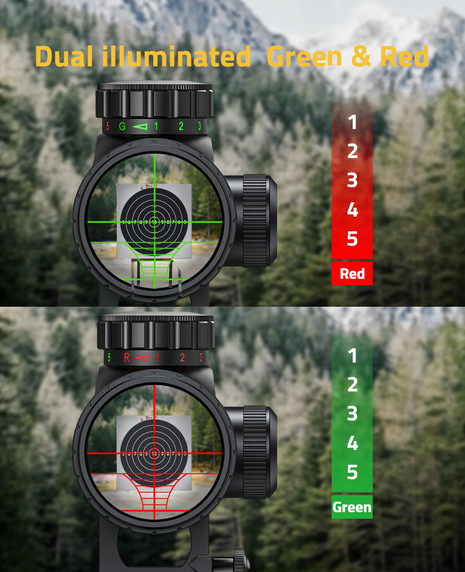
Shake Awake-Optiken sind Rotpunkt- oder Reflexvisiere, die sich automatisch einschalten, wenn sie Bewegung erkennen. Diese Funktion spart Batterie und sorgt für sofortige Einsatzbereitschaft.
Die meisten Optiken sind mit dieser Funktion voraktiviert. Lassen Sie das Visier einfach einige Minuten unbewegt, dann bewegen Sie Ihr Gewehr – der Rotpunkt sollte ohne Knopfdruck erscheinen.
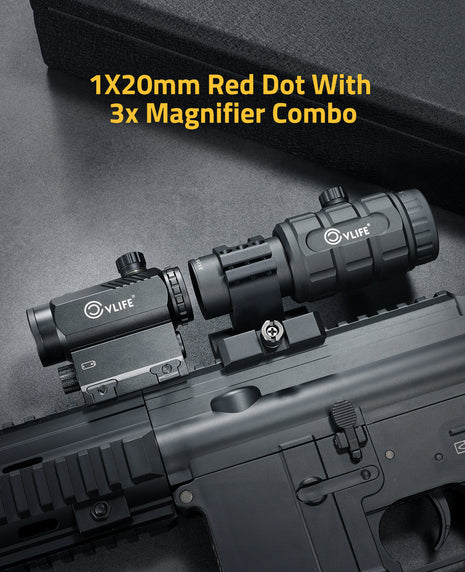
Ja. Shake Awake-Rotpunkte funktionieren gut in Kombination mit seitlich klappbaren Vergrößerungsaufsätzen. Achten Sie nur darauf, beide Optiken in der richtigen Höhe und Augenentlastung zu montieren.
Überprüfen Sie die Schraubenfestigkeit nach Ihrer ersten Schießsession. Danach monatlich oder nach rauer Nutzung kontrollieren. Vermeiden Sie Überdrehen.
Absolut. Shake Awake-Optiken sind ideal für schnelle Zielerfassung bei der Jagd auf kurze Distanzen, besonders bei Wildschweinen, Kojoten oder Weißwedelhirschen im dichten Unterholz.


$159.99 $131.99


$63.59


