KeyMod
- 1 min reading time
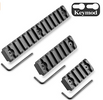
Keep reading to learn a little about the KeyMod systems, including how to mount accessories.
For years, the Picatinny rail was the leader in attaching lights, lasers, foregrips, and other accessories, but it had drawbacks. Adding a Picatinny rail onto a rifle’s handguard or fore-end adds extra weight, and some shooters complain about the extra bulk and “cheese grate” feeling it has on the hand. And although both the Picatinny and Weaver rail systems work great for mounting scopes, their shortcomings in accessory attachments left a lane open for improvement.

These shortfalls brought the next generation of accessory mounting: KeyMod and M-LOK. They are based on a slot system rather than the rail system of the Picatinny and Weaver mounts. This means a smoother surface and more mounting options.
The KeyMod handguard become as a collaboration between VLTOR Weapon Systems and Noveske Rifleworks. They alreayd released the KeyMod system to the public in 2012 in hopes of standardizing universal attachment systems. It has an open-source design, meaning the design can be used freely by any company to make rails or accessories.
Instead of having a hand guard with a picatinny rail attached, the KeyMod was designed differernt so that accessories could be mounted directly onto the rail. This allows for picatinny rails to be mounted onto the handguard wherever needed too.

How to Mount KeyMod Accessories:
The KeyMod is a modular system with the mounting slots having a key-hole profile. It is composed of two parts, they are the KeyMod slot and the KeyMod nut.
To mount KeyMod accessories:
Orient the KeyMod nut the correct way. The backer nut, which is the piece that actually can go into the KeyMod slot, protrudes on one side only at the bottom. This protrusion should face in the same direction as the muzzle of the gun. Many accessories will have an arrow to remind you of the correct orientation.
Place the backer nut of the accessory in the larger hole of the KeyMod slot, then slide it forward into the narrow section of the slot.
Screw in the accessory to give tension to hold it in place

